Mellow Mummy: recipes : Taking life as it comes...
Showing posts with label recipes. Show all posts

Monday, 8 August 2016

Creating our own Sushi with Yutaka #cookingwithkids

This weekend Lara and Holly made their own sushi using a wonderful set of Japanese ingredients that were supplied to us by Yutaka to demonstrate just how easy it is to make your own sushi at home.  Until July, none of us had ever tried sushi at all - most of us aren't keen fish eaters and sushi does often tend to feature fish and seafood but the word "sushi" means simply sweetened seasoned rice so, when you make it at home you have the freedom to add to it whatever you wish.


Yutaka sent us some sushi rice which we cooked and cooled and then Lara seasoned it with a mixture of rice vinegar, sugar and salt.  After that, both Holly and Lara got their sleeves rolled up and started to construct us a feast of vegetable and chicken sushi. 

Lara very quickly got the hang of using the Yatuka rolling mat with a sheet of nori seaweed to make sushi rolls filled with steamed carrots, beans, beansprouts and radish. The nori smells quite strong and looks really delicate but in fact it doesn't taste as strong as we had imagined; it's a superfood with lots of acknowledged health benefits - packed full of nutrients and dietary fibre, improves bone and dental health, is high in iron and rich in protein.


Holly got busy making nigri sushi which are little bricks of rice which you decorate with one or two pieces of protein or vegetable; you can hold the decoration in place with a strip of nori. Yutaka sell a special plastic device which makes it easy to mould the little rice blocks - you pat the rice into the mould, press it down and then gently press them out again (or bang them really hard like Holly chose to).  Holly enjoyed dipping these little rice parcels into roasted sesame seeds; watching her do this reminded me of watching her decorate cupcakes!

The sticky sweet rice was really hard to manage - it just got everywhere! When the girls had finished, it took me quite some time to clear up all the grains of rice, pieces of seaweed and rouge vegetables but the finished product looked really quite impressive.

To complete our dish, Lara created a homemade teryaki sauce using japanese soy sauce and mirin (a recipe on the back of one of the Yutaka bottles). We used this to marinade two chicken breasts which I think fried and sliced thinly.  To serve, we put the remaining vegetables in a bowl with some spring onion and boiled eggs and served our sushi with dipping vinegar, soy sauce and a japanese curry sauce that Mr. B. made.


The girls both very much enjoyed the sushi and teryaki chicken. Both girls even enjoyed trying out the pickled ginger which you use to cleanse your palette.  Lara, who is a big fan of spicy food, even tried out the hot wasabi paste - I think she was fascinated by it, but she chose not to go back for more!

We had great fun making sushi; it's a fun, healthy food that the kids can get really messy joining in with.


Monday, 11 April 2016

Cooking with Kids :: Mango and Cardamom Smoothie

This weekend, Holly and I had a rare morning together with no Daddy and no Lara.  Holly was desperate to do some cooking in her big sister's absence but because it was 9.30 in the morning, it wasn't really time to set about creating feasts so instead we made ourselves a little morning boost - a smoothie.


Cuisinart sent me a Soup Maker Plus to use to create some new cookery inspiration in the Mellow kitchen and, while I know we will be whipping up some amazing soups, risottos and hot savoury dishes, I really wanted its first outing to be something very different so I got Holly to choose some ingredients from the fridge. Holly chose a mango and a banana - a perfect combination for a smoothie.

This Mango, Yoghurt and Cardamom smoothie is inspired by Indian desserts and would make a perfect, light accompaniment to a strongly-flavoured curry.  We felt it was a light, summery and refreshing pick-me up in the morning.  Cardamom is a very strong flavour for a little person like Holly who wasn't totally sure about it, but she is used to the taste in our home-made curries so she kept coming back for more sips of the smoothie.

INGREDIENTS - serves 2
1 mango peeled and stoned (the riper the better...ours was a bit useless)
1 banana peeled
200ml plain low-fat yoghurt
3 green cardamom pods
2 scoops of vanilla ice cream (optional)
Mint springs to serve.


METHOD

Roughly chop the banana and mango and place into the Soup Maker Plus, blender or food processor with the yoghurt.

Firmly bruise the cardamom pods with the base of your hand, or the side of a knife and take out all the seeds - add the seeds to the fruit and yoghurt.

If you like a bit of sweetness in your smoothie, add some good quality vanilla ice cream to make the smoothie extra rich and luxurious.


Blend for about 2 minutes until the mango is totally smooth.  Holly very much enjoyed watching this magic happen!

Enjoy with a sprig of fresh mint.


I will be blogging lots more soup maker plus recipes as we create them over the coming weeks - if you have a soup recipe or risotto recipe you'd like to share with me or recommend, please leave me a link in the comments below.

Tuesday, 28 April 2015

Cooking with Kids :: Chicken Satay Recipe

Ever since I was a little younger than Lara is now, chicken satay has been one of my favourite meals.  In our house, chicken satay with rice and an oriental salad (gado gado) is probably our number one family meal that we all enjoy together.  These days the girls can help me out with a few of the main elements of the meal.

We like to serve our chicken satay with fluffy basmati rice (ideally cooked in a Rice Cooker to make it extra fluffy and to make sure that the whole house fills with the yummy smell of rice in the build up to dinner time).  I make a sweet and hot peanut dipping sauce to accompany the satay and serve the whole meal with prawn crackers.


CHICKEN SATAY with PEANUT SAUCE (serves 4)


INGREDIENTS
3 large chicken breasts
1 teaspoon turmeric
1 teaspoon chinese five spice powder
1 tablespoon vegetable oil
1 tablespoon dark soy sauce or ketchap manis
2 cloves of garlic
1 inches of ginger root
1 heaped teaspoon cornflour

For the sauce
2 heaped tablespoons of crunchy peanut butter
180ml of tap water
1/4 teaspoon chilli powder (or to taste)
2 tablespoons light soy sauce
1 teaspoon honey

For the salad
2 carrots
half a cucumber
200g beansprouts
a handful of cashew nuts
3-4 hard-boiled eggs

METHOD

1. Peel and roughly chop the ginger and garlic.  Dice the chicken into pieces no bigger than 1 inch cubes.  Place the chicken pieces with the ginger, garlic, turmeric, five spice powder, oil, soy sauce and cornflour into a large mixing bowl and mix well to coat.  Cover with cling film and place in the fridge for at least 2 hours to marinate.  Holly loves messy jobs like this (and beware, turmeric and oil have a tendency of staining EVERYTHING) but her big sister isn't so keen.


2. You can make the sauce well ahead of time.  Place all of the ingredients into a small saucepan and heat over a very gentle heat until the peanut butter melts into the water.  It will look like it is separated.  Keep stirring and within a couple of minutes it will miraculously thicken.  Once it does this, take it off the heat and pour straight into small dipping bowls to cool.

3. I also like to prepare the salad in advance because it gives me more time to concentrate on other things later.  You can serve the salad hot or cold.  Chop the carrot into batons and steam over a pan of hot water until just softened.  Place the beansprouts into the boiling water you used for steaming the carrots and keep them there for a maximum of one minute before draining them.  Chop the cucumber into batons around the same size as the carrots and then mix all the vegetables together.  Sprinkle on the cashew nuts (you may wish to toast them first) and  pieces of boiled egg.  Sometimes we also sprinkle on slices of fresh red chilli, or fresh corriander.  You can also make this salad with green beans.

4. Place the marinated chicken pieces onto skewers.  We currently use small metal kebab skewers but the traditionalist in me prefers to use bamboo skewers (you can buy big bags of these in your local supermarket) because I love the smell of the bamboo as it warms (aka burns) under the grill.


5. Grill the satay kebabs for around 10-15 minutes, turning frequently to ensure that the chicken is cooked all the way through.

Serve your satay with steamed basmati rice and prawn crackers for dipping into the peanut sauce (this is our favourite part of the whole meal).


Friday, 10 April 2015

Cooking with Kids :: Turkey Pitta Pockets with Tortilla Chips

With the change in weather, we have fancied a few lighter meals in the evenings.  Last night the girls helped me make healthy turkey pitta pockets served with an array of crunchy salads and Manomasa premium tortilla chips. It was such a quick meal to prepare, very summery and both the girls could get involved.


TURKEY PITTA POCKETS with TORTILLA CHIPS (Serves 4)


INGREDIENTS
500g lean turkey mince
Ground black pepper
5-6 thinly sliced spring onions
1/4 teaspoon mild chilli powder
1/2 teaspoon tomato puree

Approx. 6 pitta bread, cut into two pieces

Lots of raw salad vegetables such as grated carrot, tomato, cucumber, celery, crispy iceberg lettuce, raisins
Grated cheese
1 bag Mamomasa Tomatillo Salsa Tortilla Chips


METHOD

  • In a big mixing bowl, squish together the turkey mince, black pepper, spring onions, chilli powder and tomato puree.  Lara hates getting her finger dirty, but Holly loved kitchen activities like this!
  • Form the turkey mix into about 10 small patties and flatten them slightly to less than 1 inch thick.
  • Heat a large non-stick frying pan.  You can cook these with or without oil - they will take longer to cook without oil.
  • Fry for about 4 minutes on each side.  Check one of them is cooked all the way through before serving.

  • Lightly grill the pitta bread before serving.
  • The best way to serve this meal is to place the tortilla chips, cheese and salad in bowls in the middle of the table so that your children can help themselves.  Give everyone a pitta pocket and a turkey patty and then let them loose on the crispy bits.


Manomasa premium tortilla chips come in a range of shapes and sizes with some exciting flavours (which you really can taste).  Our family favourites were the Green Lemon and Pink Peppercorn traditional tortilla chips which we all LOVED.  You can find Manomasa chips in Waitrose, Whole Foods and independent delis.


Wednesday, 1 April 2015

Kids Cook French - Children's Cookery Book Review

According to Jacques Pepin, internationally renowned French chef, "the moment for a child to be in the kitchen is from the moment they are born.” Amen to that!  When I was asked to review Kids Cook French: Les enfants cuisinent a la française, a cookery book written by Jacques' daughter, Claudine Pepin I was very excited.  The book is described in the blurb as "a fun interactive cookbook for kids" and I was drawn to the fact that each recipe in the book was presented in both French and English as Lara is very much enjoying learning the french language a present.


One of the first things that I look for in a children's cookbook is photographs of the food to really get my two girls excited about the food that they could try to cook.  Unfortunately, Kids Cook French doesn't have any photographs at all, just very cute water colour illustrations that hint at one or two of the primary ingredients.  While the style may be appealing to some, it really didn't engage my two daughters, or me and when asked, Lara didn't really feel eager to cook any recipe from the book.

Its a shame because Kids Cook French does feature some very yummy french-inspired dishes and Pepin-family favourites such as Gougeres (cheesy dough balls), ratatouille, quiche, herb-roasted chicken which, in fact, is exactly what I cooked for the whole family this weekend.

And I think that's key - I cooked it.  Not the girls. I have yet to read a recipe in this book that I think actively invites a child in.  Several of the recipes seem too involved for young children  - perhaps my girls are a bit too young for this book?  In every good children's cookbook I like to see ideas for how to get children, however young, feeling involved with as many tasks as possible and when I read the foreword, this is what I had been expecting from this book.

I did enjoy reading each recipe and chapter in french and it is nice to have a cookbook which tells me how to make some traditional staples such as cherry clafoutis or Creme Brulee but I can't see Lara eagerly sitting down with this cookbook to choose her next cookery adventure.

To order Kids Cook French at the discounted price of £10 including p&p* (RRP: £12.99), telephone 01903 828503 or email mailorders@lbsltd.co.uk and quote the offer code APG309.
*UK ONLY - Please add £2.50 if ordering from overseas.

Sunday, 29 March 2015

Sweet Easter Vol Au Vents Recipe

I've never made a vol-au-vent before today but I happened to have a packet of puff-pastry that needed using up, and a roll of Bacofoil non-stick foil that had been posted to me to try out so I thought I would give them a try.  The girls asked if they could do some "Easter cooking" so I span an Eastery theme to what is ordinarily a savoury treat - these were so easy to make with the girls.


EASTER VOL AU VENTS (makes approx. 20)


INGREDIENTS
1 sheet ready-rolled puff pastry
1 medium egg, beaten
50g butter (at room temperature)
100g icing sugar
15g cocoa powder
approx. 40 mini eggs

METHOD
  • Using a crinkly cookie cutter, cut out 40 plain rounds.  Using a small plain round cutter, or a shaped cookie cutter, remove the centre piece from half of them.


  • Brush the plain rounds with a little beaten egg and then place the pieces with the holes in on top.  Put each pair onto a baking tray covered with non-stick Bacofoil and brush the tops carefully with egg - if you are too generous with the egg it will stop the pastry from rising.
  • Using a cocktail stick, prick holes in the exposed base of the vol-au-vents to try and discourage the middle from rising.

  • Place in a pre-heated oven (200 degrees in a fan oven) and cook for 15 minutes until golden brown all over.
  • Allow to cool fully on the baking tray.  The vol-au-vents are very delicate so don't try to remove them when hot.  Because the foil is non-stick, you shouldn't have any problems removing them from the foil.

  • Once totally cool, make the icing.
  • Mix the butter, cocoa powder and icing sugar in a bowl with a wooden spoon (or in an electric mixer), use a splash of milk to soften the icing if needed.
  • Pipe or spoon the mixture into each of the vol-au-vents and place one or two mini eggs on the top of each.
  • Devour


Thursday, 12 February 2015

A Valentine's Meal for Under £10 #LoveALot

I love a recipe challenge and I couldn't resist the challenge, laid down by Aldi, to spend just £10 on the ingredients for a Valentine's day meal for myself and Mr. B. Of course, I had to get in a little practice tonight and so Holly and Lara helped me create a meal that everyone loved. Aldi are hoping that this weekend, people up and down the country will spend a little but #LoveALot.


My three-course Valentine's meal has a largely Italian theme and was (for me and Mr. B. at least) accompanied by a really enjoyable crisp white Andara Chilean Sauvignon Blanc which cost a mind-boggling £3.99 for a bottle.

To start with, I served toasted ciabatta rolls (a bargain at 49p a pair) rubbed with garlic butter and topped with mozarella, tomato and basil.  Holly really enjoyed brushing the garlic butter onto the rolls.


For the main course I served a roasted chicken, fennel and basil tagliatelle with a side salad and we all LOVED it.  I cheated a bit and used ready-cooked sliced roast chicken but this meant I had more time for making pudding!


And finally, to finish off, a simple plain sponge cupcake decorated with pink buttercream and fresh raspberries. I noticed this week that Aldi had in stock lots of fun pink cake decorating items for Valentines day - very romantic.


My sugar, flour, food colouring, eggs, garlic, tomatoes and pasta will all see me through a few more meals so I came in just a teeny tiny bit over budget but given that my 3 course Valentine's meal included a bottle of outstanding-value white wine, I was seriously impressed by the quality and value.


There are lots of Valentine's day recipe ideas, wine recommendations, and tips for buying chocolates and flowers over on aldi.co.uk.  So, as my two girls day "Happy Valentime's day".

Tuesday, 16 September 2014

Cooking with Kids :: Tandoori Chicken Roti with Tikka Quark and Chana Saag

This weekend the girls spent quite a while helping me out in the kitchen.  We were experimenting with the Lake District Dairy Co. Cooking Sauce which is a range of flavoured stir-in sauces made with quark - a low calorie, high-protein dairy food which make a great alternative to creme fraiche or double cream when cooking.  We made our own Indian roti bread and filled them full of tandoori (OK... grilled) chicken and topped it off with a generous helping of Tikka Cooking Sauce and served with a home-made spinach and chickpea curry.

Tandoori chicken roti with Tikka quark sauce


TANDOORI CHICKEN ROTI with TIKKA QUARK SAUCE (serves 2 adults and 2 children)

For the tandoori chicken
6 chicken thighs (skinned and boned)
1 dessert spoon vegetable oil
1 dessert spoon curry powder
1 teaspoon chilli powder
1 teaspoon turmeric
Red and Yellow food colouring (optional)
Cucumber
Fresh Corriander (chopped)
1 pot The Lake District Dairy Company Tikka Quark Cooking Sauce

For the roti
 225g self-raising flour
1/2 teaspoon salt
1 tablespoon vegetable oil
Water

For the chana saag
1 tin chickpeas (drained)
1/2 red onion (thinly sliced)
1/2 a large bag of baby spinach leaves
1 desert spoon whole cumin seeds
1 teaspoon black onion seeds
1 teaspoon vegetable oil
1 teaspoon curry powder


METHOD
1. Roughly chop the chicken thighs into chunks about an inch long.  Place in a bowl with the oil, curry powder, turmeric, chilli powder and food colouring.  Stir well and leave to marinate for at least an hour.

2. Make the roti dough by sifting the flour into a bowl and adding the salt and oil with a dribble of water until it forms a smooth dough.  Need the dough until it turns soft and smooth and then leave it in a covered container for 30-50 minutes.


3. Shortly before cooking, break the dough into six pieces and roll each of them out into a thin round.  Brush with a little oil and fold in the edges to make a little packet.  Leave them for another 10 minutes.

4. If you don't own a tandoor, and, like me, you're also too lazy to light a barbecue then you can still cook the chicken under a grill.  My chicken pieces took about 10 minutes under a medium grill.  You can leave it to stand before serving.

5. Gently fry the onion with the vegetable oil in a large frying pan until softened, then add the chickenpeas and warm them through.  Sprinkle over the curry powder, cumin seeds and onion seeds and fry for a minute before adding in the spinach and a dribble of water.  The spinach will take a minute or two to cook while you serve the rest of the dish.

6. Just before the chicken is cooked, roll the roti packets out again into thin rounds and cook in a dry frying pan for a minute or two on each side until they start to colour and puff.

7. Heat the Tikka cooking sauce using the instructions on the tub.

Tandoori chicken roti with Tikka quark sauce


8. Place some of the grilled chicken on each of the roti breads, top with cucumber slices and then drizzle over a generous serving of quark Tikka cooking sauce.  Sprinkle with chopped fresh corriander and add a second roti to the top before serving with a spoonful of the spinach and chickpea mix.

10. Nom.

Tandoori chicken roti with Tikka quark cooking sauce


In the past I might have served a disk like this with a cucumber and thick yoghurt sauce but replacing this with a quark sauce means less fat, less saturated fat and more protein in the dish.  Everyone in the family enjoyed their tandoori chicken flatbreads and The Lake District Dairy Co. Tikka quark went down well - it was a perfect accompaniment to the dish.

Friday, 2 May 2014

Banana Cupcakes - Funspiration Activities from Flora Buttery

Last weekend, as the weather was a bit rubbish, we were largely stuck indoors and so I downloaded the Funspiration Activity Guide from the Flora website which features 15 fun activities for kids which need no more than five things and which take less than 15 minutes to prepare.

banana cupcakes with Flora buttery

Activities in the guide include making your own lava lamp, hosting a catwalk and re-enacting your own silly version of the Olympic games.  We decided to make cupcakes - can't go wrong with a cupcake, can you?  We liked the look of these easy peasy banana cupcakes which are made with bananas, flour, caster sugar, egg and Flora Buttery.  For the icing, you can use whatever you fancy... we used a buttercream icing made with Flora Buttery and a really good vanilla extract and my goodness, it was the finest buttercream I've ever made.


This was the first time in several months where both Lara and Holly had joined each other in the kitchen for a bit of cookery and it was great to see the girls working together.  OK, they argue quite a bit but Lara loves being the big sister and showing Holly how to do things like measuring out the ingredients and reading the numbers on the kitchen scales.


The cake mix was phenomenally easy to make.  We used an ice cream scoop to put the mixture into the cake cases so we managed to avoid making as much mess as normal!


Once the cakes were cooked and cooled (I shall let you follow the recipe in the Flora Buttery Family Funspiration Activity Guide), Lara and Holly used a piping bag to squeeze buttercream onto each cake as a vehicle for sprinkles.. they sprinkled on sweet banana chips, soft gold balls and a little touch of popping candy for a bit of fun!

The cakes were awesomely soft, beautifully banana-y and, like I said, the buttercream icing was to die for.  We will certainly be making these banana cupcakes again.


Disclosure: Flora Buttery sent me the ingredients for our funspiration activity

Thursday, 17 April 2014

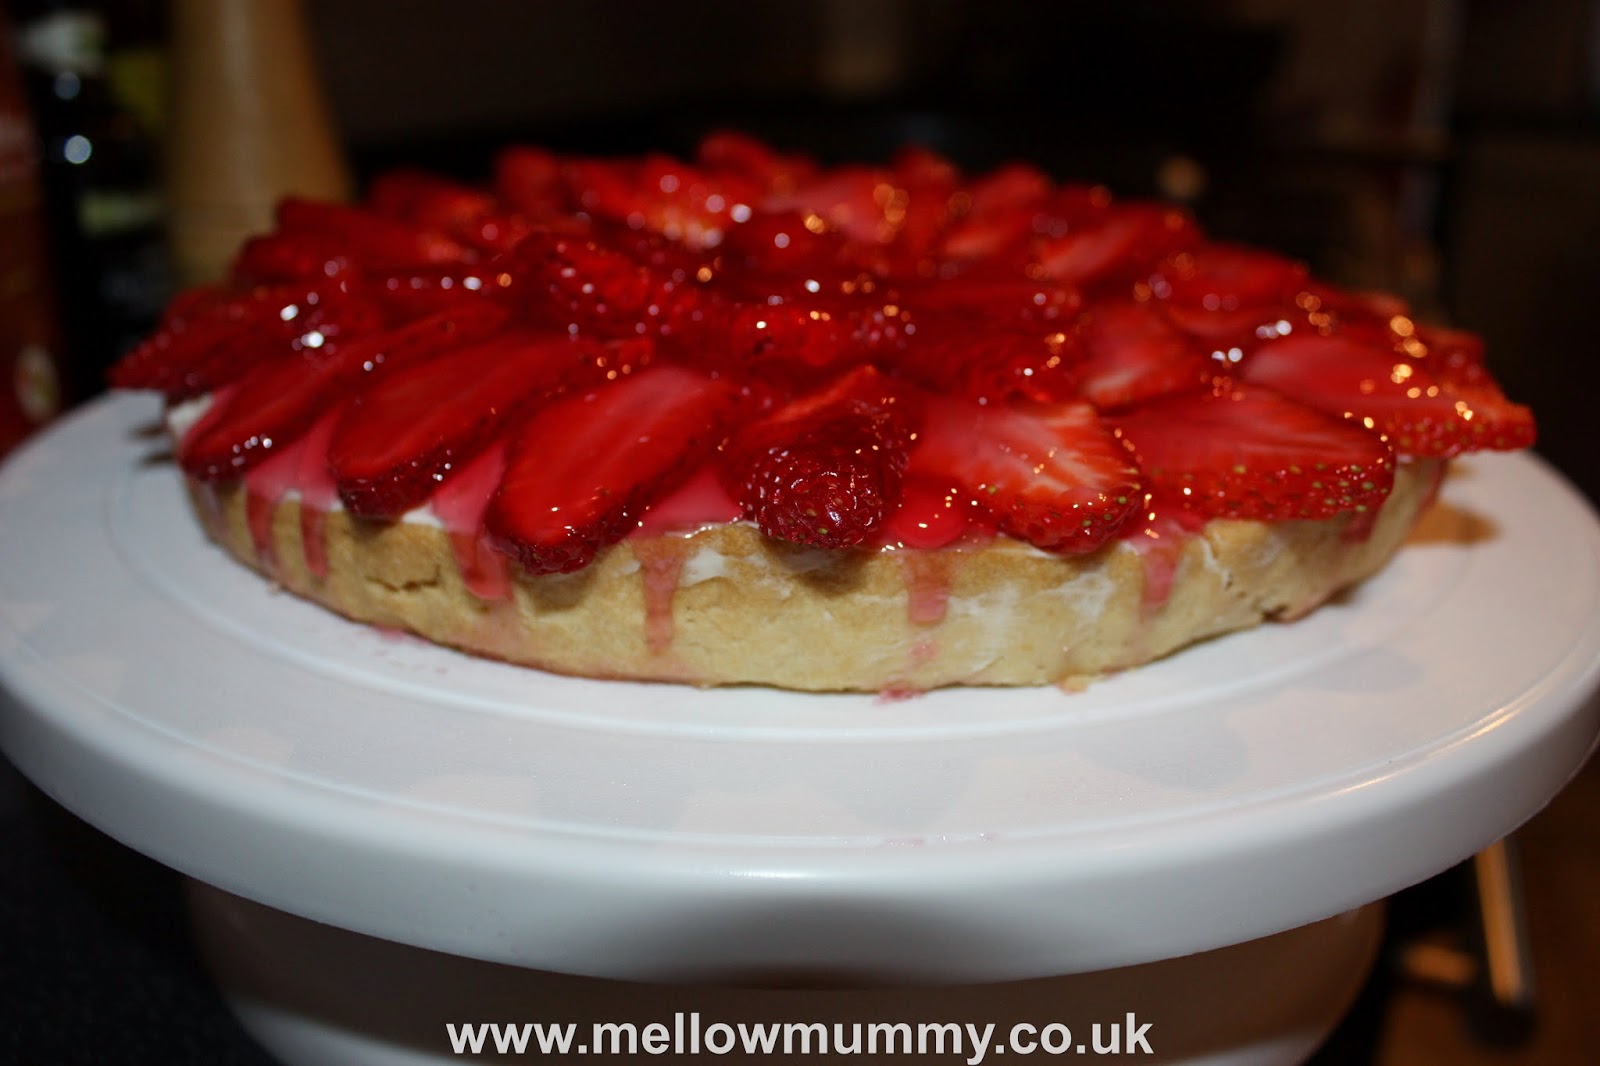
Glazed Strawberry and Cream Cheese Tart Recipe

I had intended this to be a recipe for cooking with kids. I prepped the kitchen, bought easy-to-use ingredients, layed everything out in the kitchen ready for the girls to help me out... and then they showed no interest at all and instead demanded that I let them play in the garden. Hmph.

Glazed Strawberry and Cream Cheese Tart


This recipe was inspired by a huuuge bilboard outside my local supermarket which was advertising a Luxury Strawberry and Cream Tart (ready-made, of course!) and having seen the photo I decided I simply had to try and reproduce it. I used ready rolled unsweetened short crust pastry (mainly because I had been planning on the girls making this with me!) and the mixture of the incredibly sweet topping, slightly cheesy filling and savoury pastry base worked incredibly well. This is a beautifully balanced dessert with lots of different textures and I was REALLY impressed with how even, thin and crisp the pastry was... there is absolutely no way I would have managed this recipe so elegantly if I had made the pastry myself.

GLAZED STRAWBERRY & CREAM CHEESE TART RECIPE (Serves 6)

INGREDIENTS
1 pack 320g Jus-Rol Shortcrust Ready Rolled Pastry
2 200g packs of full-fat soft cream cheese
200ml double cream
60g caster sugar
1 tsp vanilla extract
1 sachet red Quick Jel (with an additional 25g granulated sugar)
400g fresh strawberries


METHOD

1. Unwrap the shortcrust pastry about 30 minutes before use and pre-heat the oven to around 200 degrees centigrade.

2. Grease a 20cm flan dish (I used a silicone one to make it easy to remove after cooking) and place the pastry sheet over it, pressing gently into the sides. My sheet of pastry only just fitted in and I could have done with another centimetre or two at the edges. Trim the edges roughly (the pastry will shrink and change shape as it cooks so don't try to tidy it up now as it isn't worth the effort).

3. Place a piece of foil into the pastry flan and add baking beans to ensure the pastry doesn't rise and to create an even bake. Bake for around 15-20 minutes until crisp and golden all over.

4. Allow to cool fully before removing from the flan case.

ready rolled short crust flan case


5. Using a food processor, whip the double cream until it is thick and fluffy.

6. Using a wooden spoon, roughly beat the cream cheese, caster sugar and vanilla extract to soften it up a bit. Gently mix in the whipped cream so that the cheese and cream are fully blended. Spoon the mixture into the cooled flan case and use a spatula to spread it carefully to the edges and flatten it on top.

7. Chill the flan in the fridge for at least 20 minutes to harden.

8. Prepare the fresh strawberries. Don't wash the strawberries! Instead, wipe each of them clean with a moistened kitchen towel and pat dry - this way the strawberries will remain firm when you place them on the flan.

9. Top and slice the strawberries lengthways and lay them in a circular pattern from the outside of the flan, inwards. Chill for at least 10 minutes.

Arranging the Glazed Strawberry and Cream Cheese Tart


10. Make the Quick Jel according to the instructions on the packet (using water and the added sugar). Stir frequently as it cools to make sure there are no big bubbles in the jelly.

11.After about 10 minutes it will be just beginning to set and will be cool enough to drizzle over the fresh fruit on top of the flan. Use small spoon and ensure that you cover as many of the strawberries as possible to help the fruit on the flan stay fresh. Place in the fridge for another 20 minutes before serving.

Tidying up the Glazed Strawberry and Cream Cheese Tart


12. Once cooled, I trimmed away any drizzles of jelly that had escaped over the edge of the flan.  I also sprinkled on a tiny touch of icing sugar to help it glisten.

13. Devour.

Glazed Strawberry and Cream Cheese Tart

Friday, 4 October 2013

Bébé Gourmet by Jenny Carenco – My Baby Recipe Book Review

I don't know when weaning officially finishes but I've considered Holly to be fully weaned for quite some time but that doesn't mean that I'm not always on the lookout for great ideas of toddler-friendly and family-friendly meals that we can all share together whether we are 1 year old, 4 years old or grown-up.  Jenny Carenco's Bébé Gourmet is a book I wish had been around when I first weaned Lara as it is packed full of gorgeous looking recipes suitable for cooking for your little ones from the very first tastes right through to family dinners.


Jenny Carenco is a working mum of two and the founder of leading French baby-food brand Les Menus Bébé and all of the recipes in her book feel like they embody everything I've read and heard about the food culture in France.  It is well-known that baby and children's mealtimes in France are considered to be a sociable experience where families share great, simple ingredients to nurture an adventurous palette and encourage a love of great ingredients and flavours (although, interestingly Jennys foreword suggests that even in France the supermarket offerings for baby food lack inspiration).

Bébé Gourmet is split into a number of sections from those very first compotes (or purees) through first dinners to family dinners.  The first compotes section features a good range of different first-food ideas for weaning and each describes a simple means of preparation which makes the process of weaning that little less daunting.  Many of the recipes for first lumpy lunches and dinners are ideas that I had never seen before such as sea bass with fennel and green grapes or braised lentils and spinach.  For many UK mums and dads these recipes would never have previously crossed our minds but I've learned through experiences that nothing fazes a baby or toddler on their weaning journey - they love the challenge of trying new textures and flavours, even if they don't always enjoy them!  There are some beautiful recipes in this book which I really believe could encourage a child to be a more adventurous eater because of the wide range of exciting flavours.

Throughout the book Jenny (and her expert nutritionist) stresses that feeding your baby great homemade food doesn't have to be hard work but, and perhaps more importantly, that investing effort in your child's introduction to the great wide world of food pays dividends (and is very rewarding). 

Our favourite section of the book is perhaps the most relevant to us right now - family lunches and dinners that we can all share.  We recently enjoyed trying out our own homemade sweetcorn galettes (mini cheesy sweetcorn fritters) and I've used this book as inspiration for a number of simple family curries recently.  I love the fact that the recipes in this section explain to you, or show you how to prepare a single meal that is suitable however skilled you are with chewing, or with cutlery.

The final section of Bébé Gourmet has some fun ideas for snacks and treats for toddlers upwards. These are recipes for fun fruit kebabs, cakes and muesli crumbles that you can even make with your toddler for a bit of kitchen fun.

I think this book is a brilliant introduction to weaning and it is going to be one of the first gifts I give to my sister for when she becomes a mummy!


Sunday, 9 June 2013

The PicnicChallenge - Spicy Chicken Florentine Ring REcipe

Lara and I were challenged to dream up a tasty and innovative picnic food recipe using some summery Unilever products. This spicy chicken florentine ring was inspired by a recent Pampered Chef party I hosted, its my own spicy twist and is incredibly easy to make. Lara enjoys laying out the ring of the dough and dolloping on the mixture. This ring works REALLY well when you chill it and eat it for lunch the next day... in fact, I think it tastes best that way.

spicy chicken florentine ring


SPICY CHICKEN FLORENTINE RING (makes 12 slices)

INGREDIENTS
225g skinless boneless pre-cooked chicken breasts
4 spring onions
1/2 a red pepper
280g frozen chopped spinach (weighed before defrosting)
1 egg
115g mature cheddar cheese, grated
3 tablespoons Hellmann's Mayonnaise with a Spark of Chilli
1 teaspoon curry powder
2 packets of chilled ready-to-roll croissant dough
3 tablespoons Colman's Sweet Chilli Mango Sauce

METHOD
1. Preheat your oven to 190 degrees centigrade (a little lower for a fan oven).
2. Coarsely chop the cooked chicken breasts into pieces about 1cm cubed. Chop the spring onions and red pepper into similar sized cubes.
3. Squeeze the defrosted spinach dry and then coarsely chop it and add it to the other ingredients.
4. Mix the Hellmann's Mayonnaise with a Spark of Chilli and the curry powder with the dry ingredients.
5. Lightly beat the egg and then add in two thirds of the grated cheese and mix everything together; add salt and pepper to taste.
6.On a large baking tray or pizza stone, lay out the triangles of croissant dough in a circle with the wide ends of the triangles in the centre to form a ring. Let the points of the triangles point outwards and dangle off the edge of the baking tray.
7. Spoon the chicken curry mixture onto each of the triangles into 12 lumps and then use the back of the spoon to spread the mixture out into a circle.

8. Fold the points of the triangles in and over the mixture, tucking them under the centre of the circle.
9. Brush the Colman's Sweet Chilli Mango Sauce over the ring to form a glaze and then sprinkle with the remaining grated cheese.

10. Bake in the middle of the oven for approximately 25 minutes until golden.
11. Once cooled, this makes a perfect picnic centre-piece (but if you can't find a picnic box big enough to fit it in, you can cut it into 12 chunks!) I like a little extra chilli sauce for dipping!

picnic spicy chicken ring

Related Posts with Thumbnails